Best Way To Wipe Partitions from Portable External Hard Drive
With the advancement in technology and needs of individuals, the external hard drives are the common choice among users for both business and personal use. External drives are portable and compatible with most of the computers. They are of lightweight, compact and have an excellent ability to back up data from your internal drives. External hard drives have a great data storage capacity. It can be divided into multiple partitions where each partition works as a separate drive. For proper management of these files on the external hard drive, the computer makes use of a file system. Basically there are two file systems that are supported by Windows operating system, viz. FAT (File Allocation Table) file system and NTFS (New Technology File System). When you want to sell or dispose your external hard drive that contains critical data, then you need to delete whole data permanently to avoid unauthorized access to your important data. Since deleting the data using file management utilities does not permanently erase the files completely. So in order to wipe the partition from your portable external hard drive, you should use Wipe disk software.
When you delete a file or a folder, the address that is pointing to the location of the file is removed, making that specific file or a folder inaccessible. Hence, deleted files are not visible but they still exist on storage devices.
There are many data recovery application available in the market to restore deleted data. Many of us think that formatting a storage device like hard drives, deletes all its data, but its not true. Even formatting the hard drives or any other storage device does not permanently delete the data present in it. You can easily restore data from formatted portable hard drive using data recovery tools. The main problem arises while disposing or selling the HDD to others. It is very necessary to completely wipe disk drive before selling it to others. There are three different ways to wipe disk drive i.e. demagnetizing, physically destroying the disk and overwriting. But, these methods do not work properly.
So, if you want to permanently erase personal files from PC then you need to use Wipe Drive tool that uses the US DoD (Department of Defense) security standard to erase the data. It overwrites the data with a character, second pass with the complement of the first character and in the third pass, it uses random character to overwrite the content. Disk Wipe utility is effective drive wipe tool that helps in permanently deleting confidential data from hard disk drive and other portable storage devices. It is an award winning product mostly used to wipe a storage disk in Windows OS. This software overwrites the data several times on Windows hard disk drives and on other storage devices, especially those that are being resold or disposed of. This software can also erase the ambient data storage areas like file slack, unallocated file space etc. This software can also wipe files from memory cards and supports different versions of Windows Operating System such as Windows 7, Vista and XP. Along with US DoD security standard, it also uses 8 other security standards, which are Fast Zero overwrite, Random Overwrite, NATO standard, German:VSITR, Peter Guttmann Secure Deletion, US navy etc. These 9 standards are categorized based on their security level like low, medium and high. You can select appropriate pattern to wipe the disk securely and permanently. The software also helps in wiping the specific logical drive permanently. Moreover, this tool is widely known for its efficiency to wipe Dell laptop hard drive in few simple clicks.
Steps to wipe partitions from partable external hard drive are as follows:
Step 1: Download Drive Wipe and install the application.
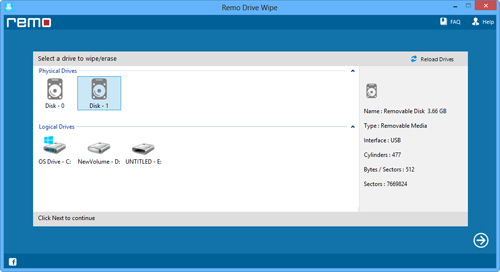
Step 2: Launch the software by selecting the software from Start Menu-> Programs or by clicking on shortcut menu on desktop. Once the software is launched, the main screen appears as shown in Figure 1. Select the USB drive from the list of logical drives and physical hard drives then click on Next button.

Figure 1: Select the drive
Step 3: Now, Select the suitable data shredding pattern among 9 different data shredding patterns and then click on Next button to securely wipe the partition as shown in figure 2.

Figure 2: Select data shredding pattern to wipe drive
Step 4: As you click on Next button, confirmation message is displayed. Click on OK button to continue the data deletion process of selected drive.