The two common ways to vanish the hard drive data is by deleting the data using file management utilities and by formatting the hard drive. Deleting all the files and emptying the Recycle Bin or formatting and reformatting the hard drive yields same results i.e. the data deleted using these two methods can be easily recovered using disk recovery tools. When the files are deleted or emptied from the Recycle bin, allocation information of those files are destroyed making those files inaccessible. When the drive is formatted, only address tables are deleted from partition table not actual data.
The same is exactly true for reformatting also. When you reformat the hard drive, it simply rewrites the first few blocks of hard drive with new file system or directory to store new files. Data recovery software reconstructs the previous file system by examining the other blocks of the hard drive. Once the file system is restored, data recovery software can easily recover as many files as possible. Hence, wiping the entire drive using powerful wipe drive application is necessary to protect confidential data against unauthorized users.
Generally, wiping a disk is necessary when you are planning to sell or dispose the hard drive. Windows drive wiping tool is powerful tool to wipe disk drive by overwriting data several times using different shredding patterns. This software uses 9 shredding patterns to wipe the hard disk, which are described as follows:
- Fast zero Overwrite: In this process, the entire storage area is overwritten by fixed value i.e. 0X00
- Random Overwrite: In this process, overwriting is done randomly in 9 passes
- US DoD (DoD 5220.22-M) _DOD Standard 5220.28 STD: In this method, storage area is overwritten by fixed value once then the complement of fixed value and finally with the random value
- US Navy, NAVSOP-5239-26_RLL: Generally, this deletion option is used for wiping RLL (Run Length Limited) encoded hard drives. In this deletion process, it uses two different fixed value i.e. 0Xffffffff and 0X27ffffff and also random value to overwrite the target area
- NATO standard: In this deletion process, overwriting is done 7 times. First 6 times with fixed value and alternating between the passes and on 7th time, it will overwrite the data area with random value
- German VSITR-US Department of Defense (DoD 5220.22-M): This option is one of the secure data sanitization methods that overwrite the hard drive storage area in 7 different passes
- Peter Guttmann secure deletion: This deletion method overwrites the data area in 35 write passes. Initially, each sector of the hard drive is overwritten 4 times by random value then the storage (target) area is overwritten 27 times by fixed value. Finally, random values are again overwritten on storage area 4 times
- DOD Standard 5220.28 STD and US Department of Defense (DoD 5220.22-M) +Guttmann method: These two options are the most secure methods for wiping the disk, which offers high security features
Drive wipe has the ability to wipe selected logical drive and also entire hard drive. This software can also wipe disk on flash memory cards and supports different versions of Windows Operating System like Windows 7, Vista and XP. It can even wipe browser history forever from your personal computer and laptop. This tool supports different version of iPods and can easily wipe files from iPod Classic, iPod Mini, iPod Shuffle, iPod Nano and iPod Touch.
Follow below mentioned steps to wipe the disk drive securely.
Step 1: Download and install Drive Wipe and then launch the software
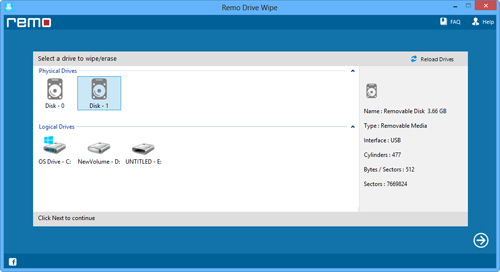
Step 2: Select the logical drive if you want to wipe the specific logical drive otherwise select physical drive from the list to completely wipe the entire physical hard drive from the list displayed on the main screen and then click on “Next” button as shown in Figure 1

Figure 1: Main Window
Step 3: From the next screen, select the suitable shredding pattern and then click on “Next” button as shown in Figure 2

Figure 2: Select shredding pattern to wipe the drive
Step 4: Now, a confirmation message is displayed. Click on “OK” button in order to continue wiping process of selected hard drive. Once the "OK" button is clicked, The software starts drive wiping process as shown in Figure 3

Figure 3: Drive Wiping Process