How to Completely Wipe Hard Drive on Windows 7?
When you are selling your computer, giving it away to someone or sending the faulty hard drive for repair, you should make sure that your data on the hard drive is properly erased. Because to avoid unauthorized access to your confidential data like bank details, family pictures, project documentation and more, it is very essential for you to totally wipe your hard drive so that it no more holds a trace of data stored before. You would have probably erased the contents of drive by shift deleting, emptying Recycle Bin, formatting, re-installing operating system, etc. But you need to keep in mind that the act of erasing a file does not mean that your files are deleted forever.
Why you need to properly erase data?
Files are not fully removed when you delete them from hard drive, the operating system just marks the space occupied by deleted files as free and just deletes its index information from file table. Deleted file content remains intact on the hard drive until its free space is overwritten by new data. Such deleted files from hard drive can be recovered back easily through the help of some powerful data recovery software. When someone recovers your data like that, it can become a serious issue when the leaked data is of great importance to you. So you have to be careful when selling or giving your hard drive to unsafe hands. But you might not be knowing how to wipe hard drive data permanently? Don’t worry, here is an efficient tool named hard drive erasing software that will protect your sensitive data from being misused. It will delete hard drive data beyond recovery by replacing useful data on hard drive with junk data.
Permanently erase data from hard disk drive through Hard disk erasing tool
Hard drive wiping tool is the most accurate answer if you are looking for erasing hard drive data on a Windows 7 computer in a secure way. It uses 9 international disk sanitization patterns, which has been approved by different government agencies and defense organizations to erase complete hard drive data. Hard disk erasing tool overwrites all free space on the hard drive with garbage data, depending upon the method selected for overwriting. It will overwrite hard drive data with zeros or with some random values for several times so that it won’t be possible for any hard drive recovery software to get back deleted files.
It works effectively on SATA, SCSI and IDE hard drive types and external hard drives. Therefore by using this tool, you can safely erase personal data from computer forever in simple steps. Hard drive wiping tool is highly revised and rated as one of the trusted tool by various industry experts. It has user friendly interface that will allow you to wipe data from entire hard drive or specific logical drive as well. It is even possible for you to permanently delete files from USB drive, iPods, flash memory cards and FireWire Drives in a few minutes. Apart from Windows 7, hard disk wiping tool works well on Windows XP, Windows Vista, Windows Server 2003 and Server 2008 operating systems. It also provides secure method for wiping external HDD completely that prevent the misuse of the external hard drive files when disposed.
Note: Click on this link: https://www.wipedisk.net/wd-my-passport-external-hard-drive.html to know how to wipe data from WD external hard disk drive.
Steps to safely erase hard drive on Windows 7 are as follows:
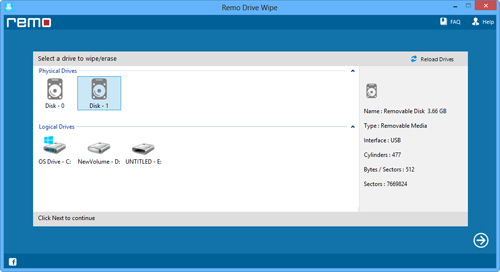
Step 1: Download Drive Wipe and install the software on your PC having Windows 7 OS and then launch it by double clicking the icon on the desktop. After the successful launch of the software, the main screen appears from where you need to select the hard drive or specific logical drive among the list of displayed logical drives and physical hard drives then click on “Next” button as shown in Figure 1.

Figure 1: Main Window to Wipe Hard Drive
Step 2: As you click on “Next” button, the next window with 9 shredding pattern is displayed. Select the suitable data shredding pattern among 9 different data shredding patterns and then click on “Next” button to permanently delete hard disk data as shown in Figure 2.

Figure 2: Select Appropriate Data Shredding Pattern
Step 3: A confirmation message is displayed after clicking on “Next” button. Now, Click on “OK” button to continue Hard drive wiping process.